scan-build는 memory leak, use-after-free, double free와 같은 문제를 검출하기 위한 정교한 Dynamic memory checker를 가지고 있습니다. 만약 C standard library 호출을 사용한다면, 즉시 검사가 가능합니다.
그러나, 많은 임베디드 프로젝트는 이러한 경우에 해당 되지 않습니다. 임베디드 시스템은 각 서브시스템(Network Stack, Graphics, Sensord Data)에 따라 Heap(or "Byte pool)을 가지고 있습니다. 이것은 하나의 시스템이 다른 시스템을 방해하는 것을 방자합니다. 또한, 임베디드 시스템에서 RAM의 속도는 Heterogeneous가 아닐 수 있고, 접근 속도에 따라 RAM을 Pool로 분할 하는 것이 바람직할 수 있습니다.
편리하게, Compiler attributes를 사용하여, malloc 처럼 동작하는 함수를 표기하고 unix.Malloc Checker를 사용할 수 있습니다.
Attributes For Malloc Checking on Custom Functions
#if defined(__clang__)

#define EXAMPLE_PROJ_MALLOC_LIKE_FUNC \
  __attribute__((ownership_returns(malloc)))

//! Note: Second Argument is the argument index for
//! the pointer being free'd. For simplicity, let's assume
//! the pointer is always in the 1st argument
#define EXAMPLE_PROJ_FREE_LIKE_FUNC \
__attribute__((ownership_takes(malloc, 1)))

#else

#define EXAMPLE_PROJ_MALLOC_LIKE_FUNC
#define EXAMPLE_PROJ_FREE_LIKE_FUNC

#endif
ownership_returns(malloc)은 Checker에게 알려주기 위한 기능입니다. 한가지 특이한 부분은, clang compiler일 경우에만 해당 attribute를 작성합니다.
아래 코드 주석에서 확일 할 수 있는 내용으로서, 메모리 할당의 경우에는 사용자 정의 함수가 가능하나, 메모리 해제에는 free라는 함수의 이름을 사용해야합니다.
#pragma once
//! @file memory_pool.h

#include <stddef.h>

EXAMPLE_PROJ_MALLOC_LIKE_FUNC
void *memory_pool_allocate(size_t size);

//! As of LLVM 10, the "unix.MismatchedDeallocator" expects
//! memory to always be released with free() and will emit
//! the following error if not:
//!
//! "warning: Memory allocated by my_malloc_func(), should be
//! deallocated by free(), not my_free_func()"
//!
//! To circumvent the error for now we remap our custom free
//! function to free() when scan-build is running. Hopefully, future
//! releases of Clang make it possible to change this rule via annotations.
#ifdef __clang_analyzer__
#define memory_pool_free free
#endif

EXAMPLE_PROJ_FREE_LIKE_FUNC
void memory_pool_free(void *ptr);
eg) Access_garbage
ptr이 동적으로 할당되었지만, Garbage 값을 더하는 문제
uint32_t example_access_garbage(void) {
  const size_t size = 10;
  uint8_t *ptr = memory_pool_allocate(size);
  if (ptr == NULL) {
    return 0;
  }

  // access the data before setting it
  uint32_t sum = 0;
  for (size_t i = 0; i < size; i++) {
    sum += ptr[i];
  }

  return sum;
}
ptr이 동적으로 할당 되었지만, Garbage 값을 비교하는 문제
uint32_t example_memory_leak(void) {
  const size_t size = 10;
  uint8_t *ptr = memory_pool_allocate(size);
  if (ptr == NULL) {
    return 0;
  }

  // ... do something with the pointer ...
  const uint8_t return_code = ((uint32_t)(uintptr_t)ptr) ? 0xa5 : 0xef;
  if (return_code == 0xa5) {
    return 1;
  }

  memory_pool_free(ptr);
  return 0;
}
Using Clangs Thread Safety Analysis for RTOS Mutexes
Clang은 Deadlock과 Race condition을 검출 할 수 있는 Thread Safety Analyzer 기능을 지원합니다. 해당 기능은 Compiler 플래그인 -Wthread-safety 를 활용하여 검출할 수 있습니다.
이 분석기는 구글에 의해 관리되고 있으며, 구글의 많은 내부 코드에 사용되고 있습니다. https://clang.llvm.org/docs/ThreadSafetyAnalysis.html의 문서에서는 C++의 특성에 대해서 잘 다루고 있지만 분석기는 컴파일러 특성을 통해서, C 코드에서도 동작이 가능합니다. RTOS를 사용하는 임베디드 시스템에서는 Flash Driver 또는 가속도 센서와 같은 Subsystem에서 Mutex를 활용하는 것은 매우 일반적입니다.
Macros helpers for utilizing -Wthread-safety in C
//! The Thread Safety Analyzers need an identifier to track things by
//! When using C++, this capability attribute can be bound to a Class.
//! For C, we'll just create a dummy variable that is not referenced
//! by actual code so it gets optimized away during compilation.
typedef int __attribute__((capability("mutex")))
  _ClangThreadSafetyLockReference;
#define INTERNAL_EXAMPLE_PROJ_DECLARE_LOCK_TRACKER(name) \
  extern _ClangThreadSafetyLockReference _##name

//! Flags a function that acquires a resource. In our example
//! we'll want to apply this attribute to flash_lock() and
//! accel_lock().
#define EXAMPLE_PROJ_FUNC_ACQUIRES_LOCK(name) \
  INTERNAL_EXAMPLE_PROJ_DECLARE_LOCK_TRACKER(name); \
  __attribute__((acquire_capability(_##name)))

//! Flags a function that releases a resource. For our example,
//! the accel_unlock() and flash_unlock() functions need this.
#define EXAMPLE_PROJ_FUNC_RELEASES_LOCK(name) \
  __attribute__((release_capability(_##name)))

//! Flags a function as requiring a lock be held by the time
//! it is invoked. For example, an "accel_read()" function.
#define EXAMPLE_PROJ_FUNC_REQUIRES_LOCK_HELD(name) \
  __attribute__((requires_capability(_##name)))

//! Disables thread safety checks for a function
//! This is required for the *_lock and *_unlock functions
//! in our example to prevent False positives.
#define EXAMPLE_PROJ_FUNC_DISABLE_LOCK_CHECKS \
  __attribute__((no_thread_safety_analysis))
Setting up your project to compile with GCC & Clang
지금까지 LLVM/Clang으로 수행할 수 있는 간단한 샘플을 보았습니다. GCC 기반 프로젝트를 업데이트하여 컴파일 하는 과정을 살펴보도록 하겠습니다.
다행히도 LLVM/Clang 프로젝트는 GNU GCC 어셈블리, Attributes, Compiler Flags, GNU Linker Script Syntax를 지원하기 위해 노력하여 프로젝트의 대부분은 이미 호환이 가능하며, Migration을 위한 노력은 거의 필요하지 않습니다.
Make Build System Compiler Aware
사용하는 컴파일러에 따라약간의 업데이트가 필요합니다. 예를 들어, Clang은 GCC가 지원하지 않는 여러 Flag를 가지고 있으므로 Clang을 사용 중일 때만 해당 플래그를 활성하고자 합니다.
아래 내용은 Clang과 GCC 타겟을 지원하기 위해 만든 MakeFile 템플릿 입니다.
# Set things up to use the arm-none-eabi-gcc that is on
# our path by default but allow things to be easily overridden, i.e:
#
# COMPILER=<PATH_TO_OTHER_GCC_VERSION>/arm-none-eabi-gcc make
# COMPILER=clang make
COMPILER ?= arm-none-eabi-gcc
CC = $(COMPILER)

# [ ... ]

ifneq '' '$(findstring clang,$(CC_VERSION_INFO))'
$(info ===Clang Compiler Detected===)

COMPILER_SPECIFIC_CFLAGS +=
COMPILER_SPECIFIC_LDFLAGS +=

endif


ifneq '' '$(findstring gcc,$(CC_VERSION_INFO))'
$(info ===GCC Compiler Detected===)

COMPILER_SPECIFIC_CFLAGS +=
COMPILER_SPECIFIC_LDFLAGS +=

endif

CFLAGS += $(COMPILER_SPECIFIC_CFLAGS)
LDFLAGS += $(COMPILER_SPECIFIC_LDFLAGS)
프로젝트에서 GCC와 호환되지만, Clang과 호환되지 않는 코드를 만날 수 있습니다. 다중 컴파일러를 지원하는 모든 프로젝트의 경우 컴파일러 세부 사항을 콩통 매크로 뒤에서 Wrapping하는 "compiler.h" 스타일 헤더가 있습니다. 예를 들어 Clang의 경우 최적화를 비활성화 하기 위해 다른 atttribute를 사용해아합니다.
GCC와 다르게 Clang은 멀티 타겟 빌드가 기본적으로 가능합니다. Cross Compile을 하기 위해서는 적절한 --target arument를 지정하면 됩니다. 해당 사항을 지정하지 않으면, 호스트 아키텍처로 설정이 됩니다.
--target 설정은 약간 복잡합니다. ARM Cortex-M의 경우에는 오직 --target=arm-none-eabi를 설정하면 됩니다.
실제 target은 <arch><sub>-<vendor>-<sys>-<abi> 의 구조를 따르며, 만약 --target=arm-none-eabi를 사용하게 되면, -mcpu 또는 -march와 같은 GCC Compiler flag로 추가 설정을 해주어야합니다.
Updating Clang to cross-compile a “bare-metal” target
ARM Cortex-M “bare-metal” targets
운영체제 위에서 동작하는 Application을 컴파일할 때, C Standard library는 자동으로 선택이 됩니다. 이와 반대로 OS 환경이 지정되지 않은 코드를 bare-metal 에서 실행 되는 코드라고 합니다. LLVM/Clang을 사용하면, 표준 라이브러리의 위치를 제공해야합니다.
C standard library - libc.a
Mathematical Functions of C standard library - libm.a
Compiler Built-Ins - libgcc.a
GNU Arm toolcahin으로 컴파일을 할 때, libc.a & libm.a & libgcc.a는 자동적으로 링크됩니다.
이러한 설정 대신, --nostdlib flag를 사용하여, 비활성화 하는 것을 추천합니다. 이렇게 비활성화를 하게되면, -lc, -lm 및 -lgcc를 추가하여 대상을 수동으로 지정해야 합니다. 이러한 방식은 더 명시적으로 프로젝트에 라이브러리 의존성을 표현하게 되면 Standard library의 스와핑이 더 쉬워집니다.
Adding standard libraries to Clang “bare-metal” compilation
Clang은 베어 메탈 ARM Cortex-M 타겟을 위한 C Standard libary를 기본적으로 제공하지 않으므로, GNU ARM 툴체인에 포함 된 라이브러를 사용하는 것이 좋습니다.
GCC와 Clang은 유용한 컴파일러 Arument를 제공합니다. 특히, Clang에서는 --sysroot를 사용하여 Clang이 사용하는 Default Standard include 경로를 변경할 수 있습니다.
MakeFile에서는 arm-none-eabi-gcc 컴파일러 명령을 사용하여 Clang에 제공해야하는 경로를 프로그래밍 방식으로 작성하였습니다.
-print-sysroot : Clang에 --sysroot 옵셔으로 전달할 PATH
-print-multi-directory : GCC 툴체인에 포함되는 libc.a과 libm.a의 상대 위치
-print-libgcc-file-name : GCC 내상 함수(libgcc.a)의 전체 경로
MakeFile은 구성은 다음과 같습니다.
# Note: These arguments will be used by clang to select
# the specific architecture target when we use the
# invoke Clang with --target=arm-none-eabi
ARCH_CFLAGS += \
  -mthumb -mcpu=cortex-m4 \
  -mfloat-abi=hard -mfpu=fpv4-sp-d16 \

# [ ... ]

ifneq '' '$(findstring clang,$(CC_VERSION_INFO))'
$(info ===Clang Compiler Detected===)

# Default assumes a GNU Arm toolchain is on your path
# but an explicit path can also be provided by doing
# ARM_GNU_CC=<PATH_TO_GCC> make
ARM_CORTEXM_SYSROOT = \
  $(shell $(ARM_GNU_CC) $(ARCH_CFLAGS) -print-sysroot 2>&1)

# The directory where Newlib's libc.a & libm.a reside
# for the specific target architecture
ARM_CORTEXM_MULTI_DIR = \
  $(shell $(ARM_GNU_CC) $(ARCH_CFLAGS) -print-multi-directory 2>&1)

# Pick up builtins needed for compilation
ARM_CORTEXM_BUILTINS ?= \
$(shell $(ARM_GNU_CC) $(ARCH_CFLAGS) -print-libgcc-file-name 2>&1)

COMPILER_SPECIFIC_CFLAGS += \
  --target=arm-none-eabi \
  --sysroot=$(ARM_CORTEXM_SYSROOT)

COMPILER_SPECIFIC_LDFLAGS += \
  -L$(ARM_CORTEXM_SYSROOT)/lib/$(ARM_CORTEXM_MULTI_DIR) \
  $(ARM_CORTEXM_BUILTINS)
endif
실제 해당 Variable을 표시하면 다음과 같습니다.
Use Clang’s-Ozinstead of-Os
임베디드 프로젝트에서는 바이너리 사이즈를 작게 만드는 것을 기준으로 컴파일러의 품질을 평가합니다. GCC를 사용하면 -Os 옵션으로 컴파일 할 때 바이너리 사이즈를 가장 작게 하며, Clang에서는 -Os를 사용하는 것보다 -Oz를 사용하는 것이 더 작게 만듭니다.
Compile Example Project with Both Clang and GCC!
GCC와 Clang 빌드 시, 다음과 같은 특성을 확인할 수 있습니다.
$ cd interrupt/examples/freertos-example-llvm/
$ make clean
$ COMPILER=clang make
===Clang Compiler Detected===
# [...]
Linking library
Generated build/nrf52.elf
   text    data     bss     dec     hex	filename
  10094    2368   13048   25510    63a6	build/nrf52.elf
$ cd interrupt/examples/freertos-example-llvm/
$ make clean
$ COMPILER=arm-none-eabi-gcc make
===GCC Compiler Detected===
# [...]
Linking library
Generated build/nrf52.elf
Generated build/nrf52.elf
   text    data     bss     dec     hex	filename
   9846    2112   13328   25286    62c6	build/nrf52.elf
Linking GCC Objects with LLVMs Linker
LLVM Linker는 GNU 링커를 대체 하기위해, 수년간 호환성을 확보하기 위해 노력해왔습니다. LLVM Linker는 공식문서에서 다음과 같이 이야기 하고 있습니다.
LLD는 매우 빠르고, 멀티코어 머신에서 큰 프로그램을 Link하면, LLD는 GNU 링커보다 두배 이상 빠르게 실행 될 것으로 예상합니다.
GCC9에서는 -fuse-ld=lld 옵션을 통해, GNU Linker 대신 LLD를 사용 가능합니다.
$ export LLVM_BIN_PATH=$(dirname $(which ld.lld))
$ make clean
# NOTE: The -B<PATH> argument tells GCC to search PATH
# for binaries
$ CLI_LDFLAG_OVERRIDES="-B${LLVM_ROOT} -Wl,-fuse-ld=lld" \
  COMPILER=arm-none-eabi-gcc make
많은 부분을 읽기 편하도록 의역하였으며, 완벽한 번역은 아닙니다. 원문 참조 부탁드립니다.
Apple products, FreeBSD, WebAssembly, Rust 등을 활용하여 개발은 했다면, 광범위하게 사용되는 LLVM을 사용하였을 것입니다. 그러나 임베디드 세상에서는 LLVM 위에서 빌드된 C 컴파일러인 Clang은 많은 관심을 받지 못하고 있습니다.
해당 포스팅에서는 Clang build target을 좀 더 편리하게 만들 수 있도록 만드는 것이며, 툴 체인에 탑재되어 제공되는 풍부한 기능 중 일부를 활용하고 예제를 통해 컴파일 시 memory leaks 또는 mutex deadlocks을 식별하는 방법을 다룰 것입니다.
Background of GCC and Clang
오픈소스 컴파일러와 툴체인의 출현은 1987년으로 거슬러 올라갑니다. 원래 GCC는 C로 작성된 GNU 오픈소스를 컴파일하기 위한 것이었습니다. 하지만, 툴체인은 다양한 언어와 언어를 지원하기 위해 성장하였고, 그 결과 코드의 기능을 확장하기에 많은 부분이 복잡해졌습니다.
LLVM 프로젝트는 컴파일러 분야의 새로운 오프소스 입니다. 이 프로젝트는 University of Illinois at Urbanan-Champaign에서 2000년에 시작되었습니다. 이 프로젝트의 초기 목표는 Standalone libraries를 설계하여 모듈식 컴파일러 툴체인을 만드는 것이었습니다. LLVM 프로젝트의 진정한 시작은 2005년 애플에서 초기 개발자 Chris Lattner를 고용하면서 시작되었고, LLVM을 자신들의 developer ecosystem에 사용되게 만들기 위해 많은 투자를 하였습니다. 이를 통해, GNU GCC 컴파일러의 경쟁자인 LLVM을 위한 프론트엔드인 Clang, C, C++, Objective-C가 나오게 되었습니다.
오늘날, LLVM 툴체인은 소프트웨어 분야 어디에서나 볼 수 있게 되었고, 최근에는 임베디드 분야에서도 채택되고 있습니다. GNU 툴체인에 비해 유리한 라이센스(Apache 2 vs GPL 3)와 모듈라 구조로 만들어진 덕분에 LLVM은 임베디드 컴파일러 시장에서 기본 선택으로 되었습니다. ARM과 SEGGER과 LLVM/Clang 기반의 컴파일러를 기반으로 하고 있습니다.
Benefits of Adding a Clang Build
많은 임베디드 프로젝트는 GCC 또는 IAR 또는 ARM Compiler를 사용합니다. 우리는 LLVM/Clang의 이점을 활용하기 위해 현재 사용하는 컴파일러의 사용을 멈출 필요는 없습니다.
정적분석
단일 컴파일러의 의존성을 줄여 향후 다른 컴파일러로 이주 시, 쉽게 전환이 가능하도록함
두번의 Error flags 설정. 두 컴파일러에서 -Werror를 사용하여, 타겟에서 디버깅 전에 이슈를 최대한 검출
Clang으로 컴파일함으로, 호스트 플랫폼에서 테스트 가능
Installing LLVM/Clang
LLVM/Clang 툴체인을 가장 손쉽게 얻는 방법은, 공식 홈페이지에서 다운로드 받는 것입니다.
원글은 Ubuntu 18.04를 타겟으로 하였으나, 제 개발 환경은 WSL Ubuntu 16.04 이므로 약간의 명령어 수정을 하였습니다.
LLVM 9.0.1 다운로드 및 PATH 설정
$ wget https://releases.llvm.org/9.0.0/clang+llvm-9.0.0-x86_64-linux-gnu-ubuntu-16.04.tar.xz
$ tar -xf clang+llvm-9.0.0-x86_64-linux-gnu-ubuntu-16.04.tar.xz

$ export PATH=`pwd`/clang+llvm-9.0.0-x86_64-linux-gnu-ubuntu-16.04/bin:$PATH
GCC에서 Clang으로 Migration을 알아보기 전, LLVM/Clang의 놀라운 정적분석과 체크 기능에 대해 살펴보겠습니다.
scan-build는 LLVM 툴체인의 포함된 정적분석기로서, gcc 또는 clang의 호출을 가로채 정적 분석 패스를 생성합니다.
scan-build는 CMake와 Make를 Overiding하여 사용함으로서, 호출하는 것은 다음과 같이 간단합니다.
$ scan-build make
$ scan-build cmake ..
scan-build는 많은 수의 Checkers를 가지고 있고 기본적으로 활성화되어 있습니다.
scan-build --help를 통해 활성화되어 있는 Checker를 확인 가능합니다.
$ scan-build --help
CONTROLLING CHECKERS:

 A default group of checkers are always run unless explicitly disabled.
 Checkers may be enabled/disabled using the following options:

 -enable-checker [checker name]
 -disable-checker [checker name]
[...]
AVAILABLE CHECKERS:

 + core.CallAndMessage           Check for logical errors for function calls and Objective-C message expressions (e.g., uninitialized arguments, null function pointers)
 + core.DivideZero               Check for division by zero
 + core.DynamicTypePropagation   Generate dynamic type information
 + core.NonNullParamChecker      Check for null pointers passed as arguments to a function whose arguments are references or marked with the 'nonnull' attribute
 + core.NullDereference          Check for dereferences of null pointers
 + core.StackAddressEscape       Check that addresses to stack memory do not escape the function
 + core.UndefinedBinaryOperatorResult Check for undefined results of binary operators
[...]
NOTE: "+" indicates that an analysis is enabled by default.
기본 설정은 static-build를 사용하기에 좋은 시작점이고, 손쉽게 Checker를 변경이 가능합니다.
아래 예제를 통해 Clang 또는 GCC 컴파일 과정 중 발견하지 못하는 잠재적 이슈를 발견하는 흥미로운 과정을 볼 수 있습니다.
<예제>
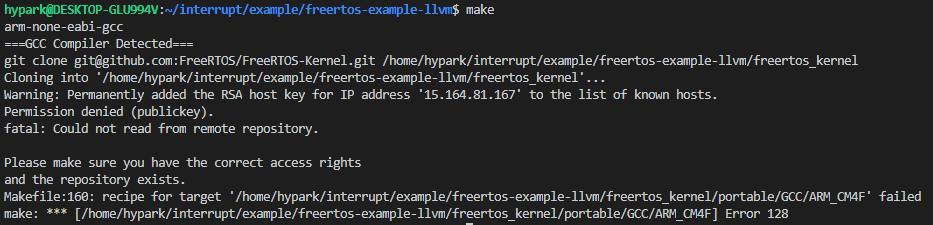
$ git clone https://github.com/memfault/interrupt.git
$ cd interrupt/example/freertos-example-llvm
$ make
위의 명령을 실행하면, 다음과 같은 오류를 만나게 됩니다.
MakeFile 내에서, FreeRTOS를 클론해오는 과정에서 발생하는 문제인데 권한이 없어 발생하는 문제로 보여 아래와 같이 수정을 합니다. (MakeFile 내, 159 번째 라인